🎉
Desktop Docs is now Cosmos!

How to Find Files on Mac

March 6, 20245 min read
How to Find Files on Mac

Sometimes it's hard to organize all the files on your Mac desktop. In this guide we'll cover your options for how to search for files on a Mac.

Table of contents

When your computer is new, it’s easy to browse and find files you need. Everything is neatly organized in a few folders. However, over time finding files on your Mac starts to get hard because you create more files and your applications start to create files too. In this article we’ll help you search for and find any file on your Mac.

How to find a file on Mac

There are 2 basic ways to find files on your Mac:

  • Finder: application to browse all the folders and files on your computer
  • Spotlight: shortcut to search your Mac and its applications.

These are both applications that come installed with your Mac by default. If you know the folder where the file is stored, you can open your Finder and navigate your directories to find your file. This is the most straightforward way to find your files.

If you aren’t sure where your file is located, you can use Spotlight or Finder search to track it down.

How to search on Mac using Spotlight

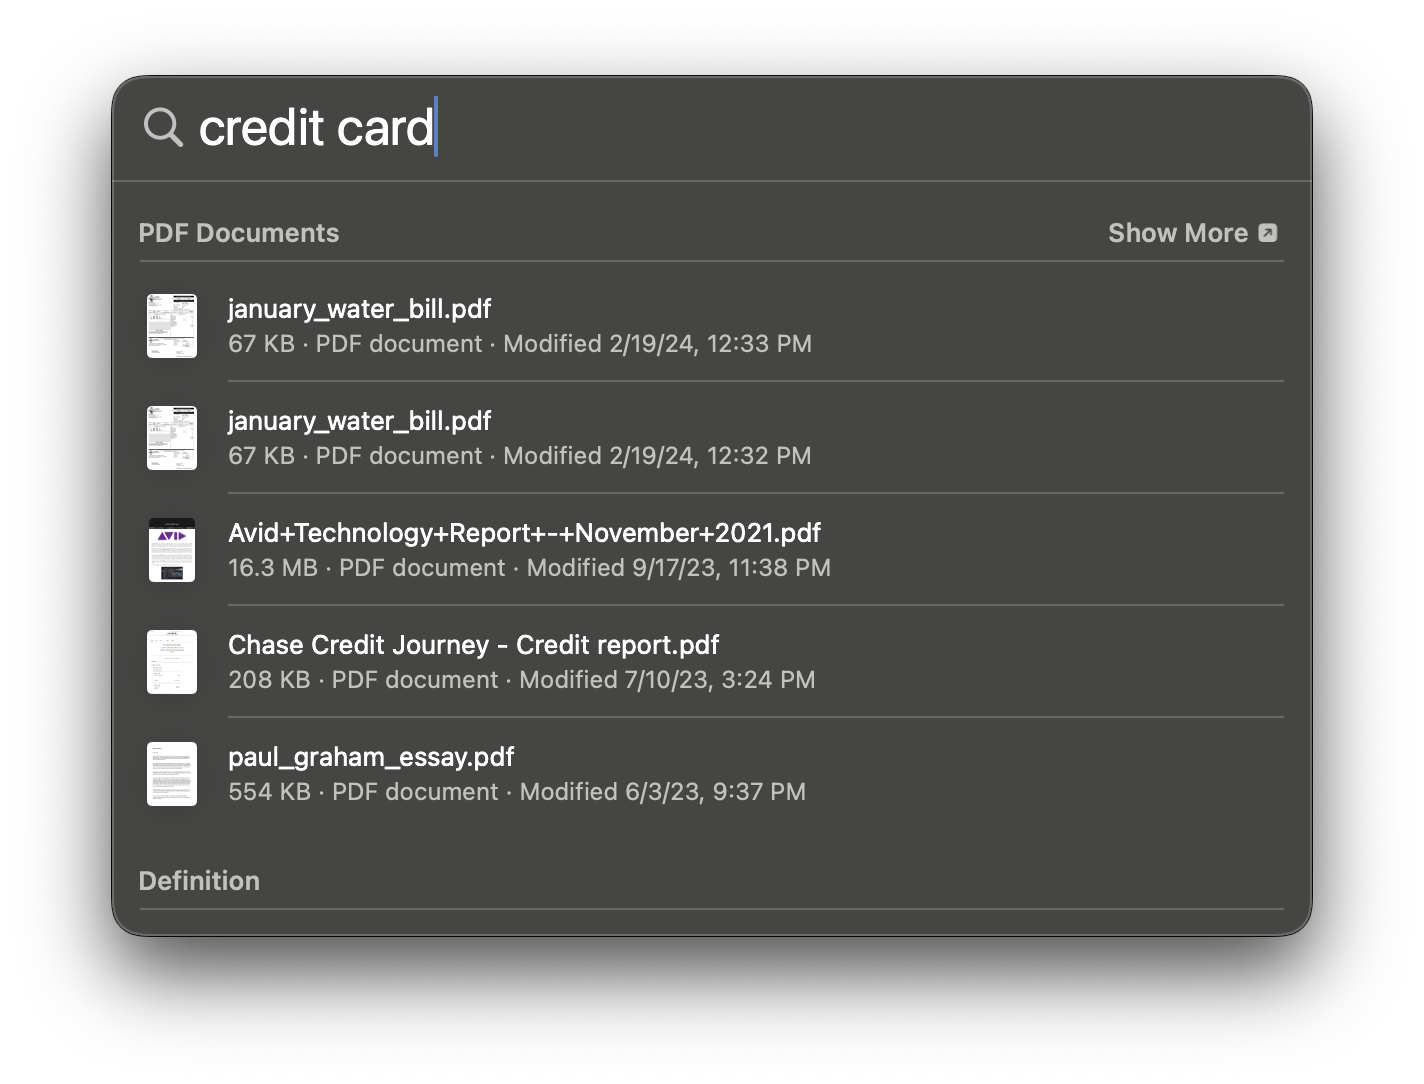
Spotlight has a few different use cases. You can use it to search the web, open apps like Safari, or find files on your Mac. It can search all your files and return related documents. When you search with Spotlight you are looking through everything in your computer.

Example of entering "Credit Card" into Spotlight.

How to use the Finder to find files on your Mac

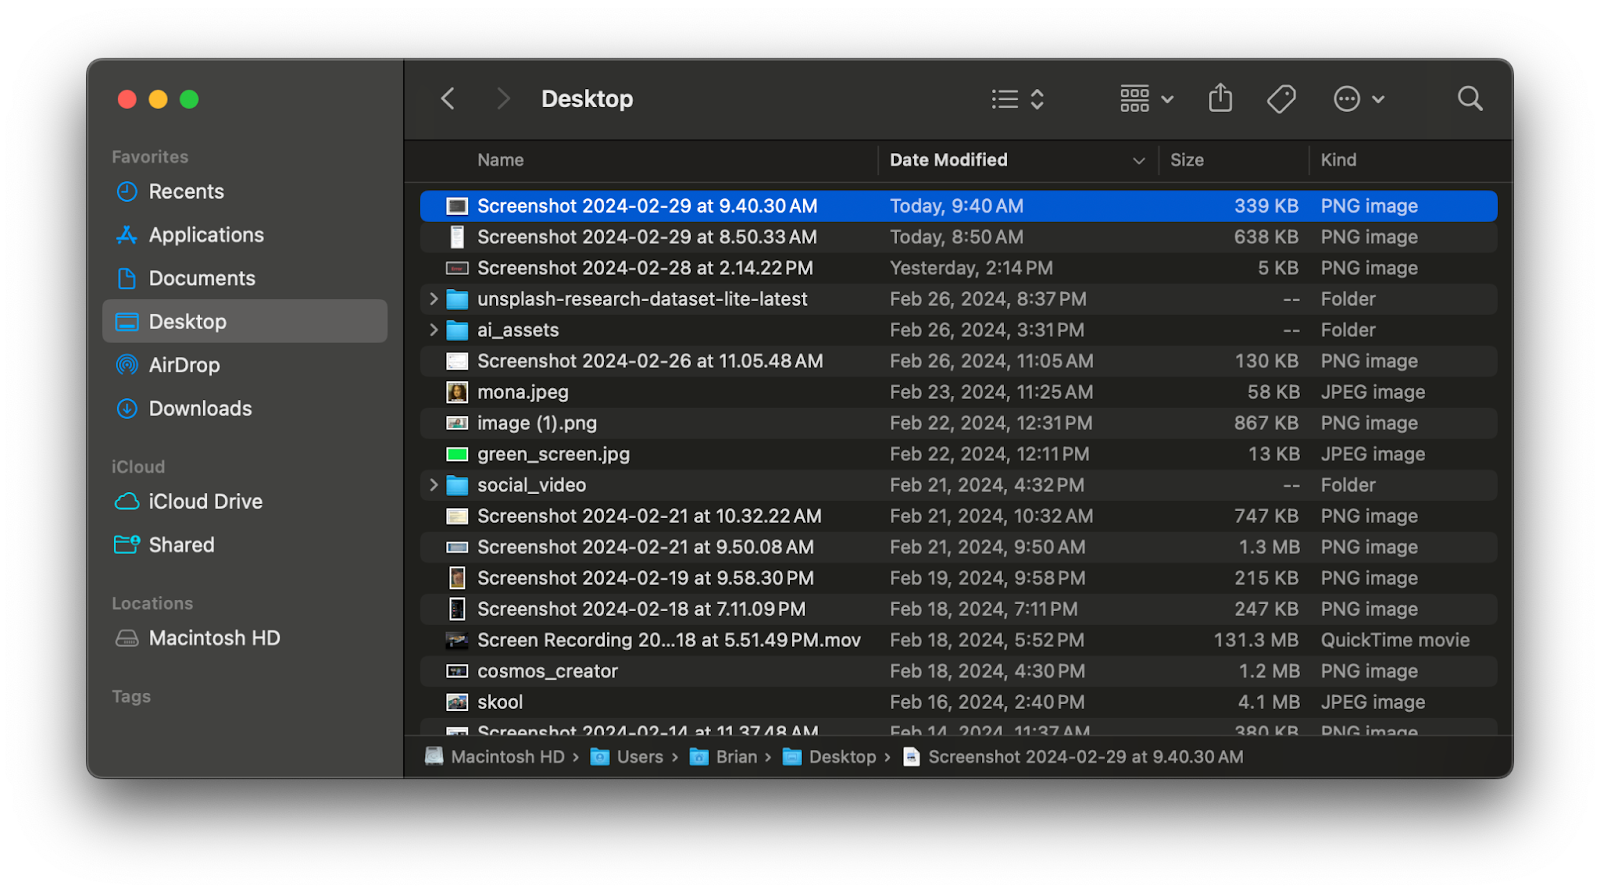
The Finder is an alternative to Spotlight that is dedicated specifically to browsing your files. To open your Finder you can click on the Finder icon in your application Dock (usually on the bottom of your screen). From here you can start to click on folders or preview files by selecting them and pressing the Spacebar.

Finder (software) - Wikipedia
Mac Finder icon

It’s true that looking at files individually is not the fastest way to search your files, but if you aren’t sure what you’re looking for, this gives you a birds-eye view of your files.

Another important thing to know is that the Finder comes with its own search bar. It’s usually on the top-right (it has a Magnifying Glass icon). From here you can search file names that contain your search term. The results are not always great, but if you already know the name of the file you’re searching for, this is a good option. 

You can also add filters to your search. This search could use some improvement, but for example, you can add the date created, file contents, and file name. In our experience this is the Finder's worst search method, but in some limited cases this option might work for you.

On the top-right you can spot the search icon for the Finder.

How to make files easier to find

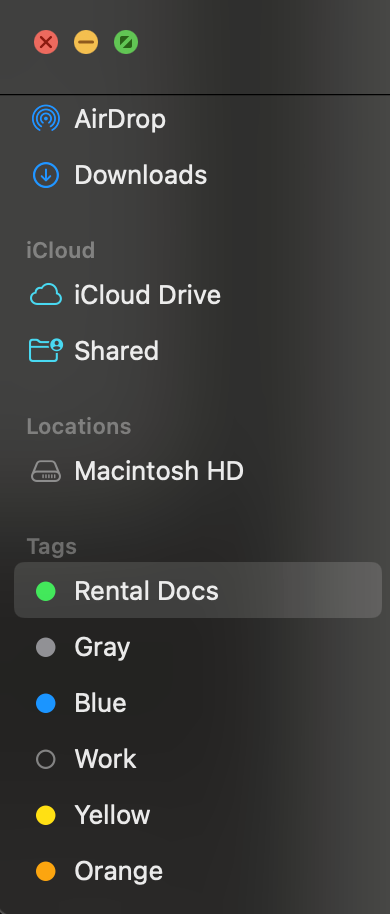
Another helpful feature in the Mac Finder is the ability to tags files. It’s basically a way to color-code your files so you can easily find your files by topic or theme. For example, if you want to label all the files you are using for a apartment rental application, you can tag them with a color and easily navigate to that tag in your finder. 

We like the tagging system because it gives you complete control over what files you want included in your tags. It does not matter where the files are stored on your computer. If they have a tag, you can easily find your files, wherever you put them.

Any file I tag as "Rental Docs" will always be visible on this side-panel.

New tools

If you don't want to use the default Mac applications, there are also other options. At Desktop Docs, we're building a better way to search your Mac. We are improving on the Finder and Spotlight so you never lose a file again.

We will help you find your pdfs, images, and videos stored on your computer. If you're interested in trying us out, visit our site to download our AI File explorer or contact us on Twitter.

Frequently asked questions

How do I find files on Mac?

Mac comes with 2 basic features to find your files. Mac Spotlight is a shortcut for quick searches. The Mac Finder is better if you need to know the folder where the file is located.

How to organize files on Mac Desktop?

Two powerful methods for organizing is using tags. Both the Finder and Cosmos support tagging your files so you can easily filter based on relevant criteria.

How do I search on Mac using Spotlight?

Command+Spacebar will open the Spotlight. Type in the file you are searching for into the box and it will return results from your computer and the web.

How do I use the Finder to find files on Mac?

Open a new Finder window from the dock. Navigate to your desired folder and double-click to see its contents. There is also an arrow on the folder you can use to expand it. This will show you all the files in the folder.

Is Finder or Spotlight better for finding my files on Mac?

Spotlight is good for quick searches. If you need to know the location of your files and you want to create tags for collections of files, the Finder is better.

Are there any better options to find and organize files on Mac?

We're developing a tool that combines the Spotlight and Finder into a single application. It's called Desktop Docs. We're making it easy to search your files by letting your browse them all in one place.

Related Posts

Continue reading with these related articles

Building a Creative Workflow That Actually Works

Building a Creative Workflow That Actually Works

The best creative workflow is the one that disappears. When your systems work, you forget they exist. You're not hunting for files, deciphering unclear feedback, or switching between twelve different tools to finish a project. You're just creating. Most creators approach workflow backwards. They think organization comes first, then creativity follows. The reality is that it’s hard to “turn on” creativity on-demand. So if you build the process before you’ve created anything you might be stifling your own creativity before it begins.   Sustainable creative systems start with understanding how you actually work, then building structure around that reality. Your workflow should amplify your creative energy, not compete with it. Start with energy, not efficiency Before you download another productivity app or reorganize your desktop folders, spend one week tracking something more important: your creative energy. Notice when workflow friction drains you vs. when smooth systems energize you. Pay attention to the difference between productive creative struggle (solving a design problem) and wasteful operational struggle (finding the right file version). Most workflow breakdowns happen because we're trying to force creative work into systems designed for administrative tasks. Creative work is iterative, collaborative, and often non-linear. Your workflow needs to support that. The goal isn't to eliminate all chaos from creative work. It's to eliminate the chaos that doesn't serve the creative process. Build systems that learn with you Your first workflow system should be simple. Pick one recurring frustration: maybe it's file naming, project handoffs, or client communication, and create the most basic solution possible. Not because simple is better, but because simple systems get used. Complex systems get abandoned when you're under deadline pressure, which is exactly when you need them most. Start with: * Consistent file naming that makes sense to future you * One communication channel per project type so conversations don't get scattered * Basic project templates for recurring deliverables Test these simple systems on 2-3 projects before adding any complexity. You'll learn what actually works versus what sounds good in theory. The best workflow systems evolve with your work. They adapt to new clients, new platforms, and new creative challenges with minimal tweaks. Design for your creative brain Creative work happens in cycles: research, ideation, production, refinement, delivery. Each phase requires different types of focus and different operational support. The research phase needs easy information capture and organization. Ideation needs minimal friction to externalize ideas. Production needs focused time without operational interruptions. Instead of one-size-fits-all systems, break it down into smaller pieces for different creative phases: For research and inspiration: Quick capture systems that don't interrupt flow. Voice memos, screenshot folders, bookmark systems that require zero categorization in the moment. You’re collecting rainwater. For ideation: Low-friction tools for getting ideas out of your head. Sticky notes, voice recordings, rough sketches. Organize later, not during. For production: Distraction-free environments with everything you need readily accessible. Close communication apps, batch operational tasks before or after creative sessions. This is dedicated practice. For refinement: Clear feedback systems that keep revisions focused and productive. Templates for feedback, version control that prevents confusion. Assess the signal from the noise. Your workflow should switch modes seamlessly as your creative brain does, but it should never multitask. Collaborate without chaos Most creative work involves other people: clients, teammates, vendors, stakeholders. Each additional person multiplies the potential for operational chaos. The key is designing collaboration points, not leaving them to chance. Establish communication boundaries: Different conversations need different tools. Quick questions live in messaging apps. Project feedback goes directly on the work. Status updates use email or project management tools. Emergency issues get phone calls. Send 20 texts when a 5 minute phone call will do. Create handoff protocols: What information does the next person need? In what format? By when? Template these handoffs so nothing falls through the cracks. Build approval processes that actually work: Instead of endless revision cycles, establish specific criteria for "done." What exactly needs approval? What can you iterate internally? Who has final decision-making authority? Clear collaboration protocols protect everyone's creative energy by eliminating confusion, reducing back-and-forth, and preventing scope creep. Make technology serve creativity The right tools can dramatically reduce workflow friction. The wrong tools create more problems than they solve. Choose tools based on how well they integrate with your actual creative process, not their feature lists or what’s popular with productivity gurus on Youtube. The best project management app is worthless if your team won't use it consistently. For file management: Cloud storage with good search, consistent syncing, and simple sharing. Avoid complex folder hierarchies that you'll forget about in six months. Embrace tools with AI search already built in. For client communication: Whatever your clients already use comfortably. Don't make them learn new tools just to work with you. For feedback and revisions: Tools that let people comment directly on the work. Visual feedback on visual work, written feedback on written work. For project tracking: Simple systems that update automatically when possible. If updating your project status feels like extra work, you won't do it when busy. Simple spreadsheets are often the best tools here. The goal is a small toolkit of reliable tools that work well together, not a comprehensive suite that does everything poorly and eats into your content ROI. Build in creative recovery Sustainable creative workflows include intentional recovery time. Not just breaks between projects, but meaningful time to recharge your creativity. Schedule creative input time: Regular periods for consuming inspiring work, learning new techniques, or exploring adjacent creative fields. This isn't procrastination—it's feeding your creative process. Protect exploratory projects: Work that has no client, no deadline, and no defined outcome. Creative play keeps your problem-solving skills sharp and prevents your style from getting stale. Design sustainable work rhythms: Match your project schedule to your natural energy cycles. If you're most creative in the morning, protect that time for your hardest creative challenges. This is hard, it’s mostly old-fashioned discipline. Your workflow should make space for the kind of work that keeps you excited about creating, not just the work that pays the bills. Measure what matters Track workflow improvements by how they affect your creative capacity, not just your productivity. Are you spending more time on actual creative work versus operational tasks? Are projects finishing with fewer stressful last-minute pushes? Do you feel more excited about your work at the end of the week? The best workflow metrics are qualitative: energy levels, creative satisfaction, and sustainable output over time. You can’t improve what you don’t measure. If your new systems are making you more productive but less excited about your work, something needs adjustment. Optimization that drains your creative enthusiasm isn't optimization, it's just efficient burnout. Start small, think long-term Pick one workflow pain point that consistently frustrates you. Spend 30 minutes this week creating the simplest possible improvement. Maybe it's a file naming convention that takes 10 seconds to implement but saves 5 minutes every time you need to find something. Maybe it's a project brief template that prevents confused client communications. The goal isn't to solve every workflow problem at once. It's to build momentum by proving that intentional systems actually make creative work more enjoyable. Your creative work deserves operational support that enhances rather than hinders your best thinking. Build systems that disappear into the background so your creativity can step into the foreground. Thanks for reading. If you found this helpful, share it with someone who's building their own sustainable creative practice.

June 2, 20257 min read
Advanced image search engines focused on privacy and precision

Advanced image search engines focused on privacy and precision

Learn about some fantastic alternatives to Google for finding images. If a picture is worth a thousand words, an image search engine is worth millions. But finding the perfect image with the necessary usage rights? That tends to get overwhelming, fast. Fortunately, advanced image search engines can make the process seamless and secure. Today’s options expand well beyond yesterday’s go-tos like Google or Bing. Advanced image search engine tools can let you filter by file type, resolution, and copyright licenses, offering a tailored experience. (Some even offer AI to help guide your search.) From verifying authenticity with reverse image search to exploring premium services like Getty Images, the possibilities are endless. If you're not sure which factors you should consider, check out our guide on key factors for choosing an advanced image search engine. If you already know that privacy and precision are most important to you, read on for a few great options. What is an advanced image search engine? Advanced image search engines allow users to get results beyond the typical image results. These tools offer specialized filters, like file type or resolution, which help you narrow down what you need. More than that, these engines often have enhanced features, like reverse image search or metadata retrieval. This makes them invaluable (even though many are free) for anyone needing more control over their image results. If you feel frustrated by Google or Bing’s limited filtering options, other advanced search engines can offer you more flexibility. What is a reverse image search? A reverse image search allows people to search for images using an actual image instead of a text-based search. Whether you upload an image or provide a URL, the engine will scan the web or an archive to find where that image appears. This can help you by offering you similar images or higher-resolution versions. This method can help confirm the authenticity of images by tracing them back to their original creators. It can also serve as a form of fact-checking to verify if an image has been altered or misused online. How to use an advanced image search engine To maximize the potential of advanced image search engines, experiment with different filters and keywords. Depending on the search engine you choose, you can adjust its search filters to target: * Colors * File formats * Specific sizes * Resolution (high/low quality) * Date or time range (new or older images) * Image type (photo, illustration, vector, etc.) * Image orientation (landscape, portrait, etc.) Paid platforms like Getty Images or Shutterstock provide high-quality images but at a price. These platforms often offer comprehensive usage rights, making them the go-to for commercial use. On the other hand, free alternatives like Flickr or Yandex Images provide vast libraries of visuals but require extra caution when considering copyright usage. Paid vs. nonpaid platforms: which should you use? The choice between paid and free platforms largely depends on your needs. Paid platforms like Getty Images and Shutterstock offer high-resolution, professionally curated images with clear usage rights. These platforms come with a hefty cost, but the licensing and quality are top-tier. Prices can vary, with subscriptions offering images at as low as $49 and $29 per month, respectively. Free platforms like Yandex or Flickr offer a range of images but often lack the clarity and security around licensing. You’ll need to proceed with caution and verify usage rights carefully ahead of making any content with the images. Try these advanced image search engines If you’re ready to branch out beyond the most well-known advanced image search engines, we have four we think you’ll love. * Desktop Docs: Desktop Docs allows you to search your personal media library quickly and efficiently. Simply download the software, upload your images, and search through your videos and photos for original or related content—all while keeping everything on your device. No need for an internet connection or subscription fees, and your privacy and copyright are secure. * Swisscows: For users who value privacy above all, Swisscows is a great choice. Based in Switzerland, a country outside the Five Eyes alliance, Swisscows ensures that no user data is tracked or stored. The platform’s privacy-first approach makes it ideal for those looking to perform secure, anonymous searches without compromising on the quality of results. * Yandex Images: Yandex Images is known for its powerful reverse image search capabilities. Users can easily upload images or paste URLs to find where those images appear online or locate similar visuals. While Yandex is not subject to the Five Eyes surveillance agreements, it's important to note that it operates under Russian regulations, which means data may be accessible to the Russian government. * Startpage: Startpage, based in the Netherlands, uses Google’s search engine to generate results but ensures that no personal information is tracked or stored. Although the Netherlands is part of the Nine Eyes alliance, Startpage’s no-log policy makes it a standout option for privacy-conscious users who still want the robust results that Google provides. 💡Disclosure: the authors of this post also created Desktop Docs. Follow Desktop Docs on LinkedIn to learn more about automation, content creation, and how Desktop Docs can help you with both. Finding the right image doesn’t have to mean compromising on privacy or quality. With free tools like Yandex and privacy-first options like Swisscows, the possibilities are endless. These advanced image search engines offer you a chance to explore new ways of finding visuals that suit your needs—all while keeping your data secure and supporting creators. The only thing left to do is try something new and discover how these tools can transform the way you search for images.

October 18, 20245 min read
Best software for photo organizing and editing features

Best software for photo organizing and editing features

We curated the top tools to streamline your photo management and editing process Creatives are often juggling hundreds of files a week. Organizing and editing photos or videos at that scale can be a real headache—and it adds unnecessary burden to your workload. Whether you're a freelance YouTube creator (a self-employed content creator) or part of a mid-sized marketing agency, having the right tools to streamline your workflow is essential. In this blog post, we’re exploring five of the top contenders in the photo organizing and editing space—which includes Desktop Docs, of course. 📣Disclosure: we are also the creators of Desktop Docs. Learn more about how Desktop Docs can help you manage and search your files on its Product Hunt page! The essentials you need in photo editing and organizing software Before getting started with photo editing or organizing tools, it’s essential to find software that does more than just edit photos well. You need a system that make sense for your day to day. Whether you're a photographer, content creator, or video editor, choosing the right software means looking for key features that meet your specific needs. Consider the following before committing to software: * Privacy: Tools like Desktop Docs and ON1 Photo RAW keep everything local, so your work stays on your device without being uploaded to the cloud. * Affordability: You want a software that suits your budget while offering professional-level capabilities. * Easy organization: Look for software that helps you manage your files efficiently, so you spend less time searching and more time creating. * Intuitive editing tools: Even if you’re not a professional editor, great software should include simple editing feature like resizing and transforming file types. * Workflow integration: Choose a tool that integrates with your existing process, making it easy to switch between organizing, selecting and editing files. Some creators prioritize the privacy and control that local storage provides. But if you're on the go and need to access your files from multiple devices, cloud storage may be a must. However, if privacy and speed are more important, locally installed software like Desktop Docs keeps your files secure and easily accessible—even without an internet connection. 😵‍💫Not sure what you need? Check out our blog on photo storage solutions to find out more about and how to choose the best one for your needs. Top 5 contenders for organizing and editing photos We’ve done research and rounded up five exceptional options, including our very own Desktop Docs, to give you a clear picture of your choices. These tools are designed to keep your workflow efficient, organized, and (most importantly) stress-free. 1. Desktop Docs Streamline your file search with AI-powered organization Desktop Docs is designed for creators with loads of files to manage. Our software helps you find, organize, and edit your images, videos, and more without needing to remember obscure file names. Our strongest focus is on privacy and ease of use, so your files are yours—no cloud storage or third parties involved. * Pricing: One-time payment of $24.99 * Best for: Content creators, designers, video editors, and anyone tired of losing files * Features: Advanced file organization, cross-device sync, privacy-friendly, AI-powered search 2. Adobe Lightroom The gold standard for professional photo editing Adobe Lightroom has long been the industry favorite for photographers and creatives alike. With powerful editing capabilities and cloud syncing, Lightroom is a solid choice for those looking for advanced features. * Pricing: $9.99/month or $119.88/annual * Best for: Professionals who need both editing and cloud storage. * Features: Advanced editing tools, cloud storage, cross-device sync. 3. ON1 Photo RAW A one-time purchase for powerful editing and organizing ON1 Photo RAW offers advanced photo editing and organization without a subscription fee. It’s ideal for creatives who want to invest in software and not worry about monthly costs. * Pricing: $99.99 to $169.99 one-time payment or as low as $7.50/month subscription * Best for: Creatives who prefer a one-time payment/like non-subscription options. * Features: Advanced editing tools, offline organization, no cloud dependency. 4. Mylio Organize your photos across devices with ease Mylio is perfect for people who have large photo libraries and want cross-device sync without relying heavily on cloud storage. Its editing features are somwhat basic; its organizing capabilities are top-notch. * Pricing: Free for up to 25,000 photos; premium plan at $9.99/month * Best for: Casual photographers and organizers with large libraries. * Features: Cross-device sync, cloud storage optional, basic editing tools. 5. Darktable Open-source power for photo editing Darktable is the go-to for those who want free, high-quality editing software without sacrificing too much in terms of features. The interface can be complex. Once you get the hang of it, it’s a powerful tool for serious editors. * Pricing: Free * Best for: Users who want robust editing features and don’t mind a learning curve. * Features: Advanced editing, no cloud integration, open-source, privacy-friendly. How these 5 photo organizing tools compare We compared these 5 tools with 8 specific features that are most relevant to the average person looking for photo organizing software with editing features. Feature Desktop Docs Adobe Lightroom ON1 Photo RAW Mylio Darktable One-time payment Yes ($24.99) No Yes No Yes (Free) Free trial No Yes Yes Yes Yes (Free) Yearly cost < $50 Yes No No Yes Yes (Free) Cloud data No Yes No Yes No Shares data No Yes No Yes (optional) No Cross-device sync No Yes Yes Yes No Editing tools Advanced Advanced Advanced Basic Advanced Organizing features Advanced Advanced Advanced Advanced Advanced Find the right fit for your workflow The right tool depends on what you need. If you're looking for cutting-edge AI file management with editing tools and seamless export to Adobe Premiere, Desktop Docs has you covered. For those who prefer cloud syncing, other solid options like Lightroom are available. Ultimately, the goal is to find a tool that complements your process and lightens your workload.

October 14, 20245 min read